Live Cut - Step by step
Adding tracks
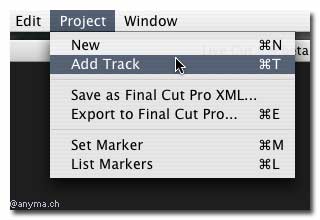
- Add up to four tracks by clicking on the "Add track" button or tying command-T.
- Please note that the first track serves as the base track. It determines the length of the timeline and all timing depends on this track. It can't be moved nor removed, Also (for now, at least) only sound of this track will be exported to Final Cut.
Navigation
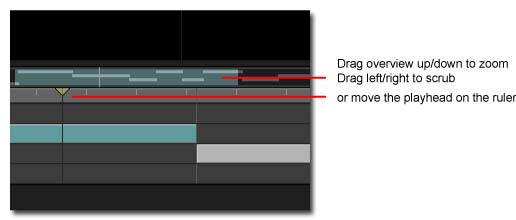
- You can move the playhead by dragging or clicking in the timeline ruler, as well as in the overview.
- The timeline can be zoomed by dragging upwards or downwards in the overview.
- Hit [space] to start/stop.
- Final Cut's j-k-l shortcuts work as well, though fast forward and reverse playback gets a little jerky...
- Hitting [tab] jumps two seconds back.
Synchronizing
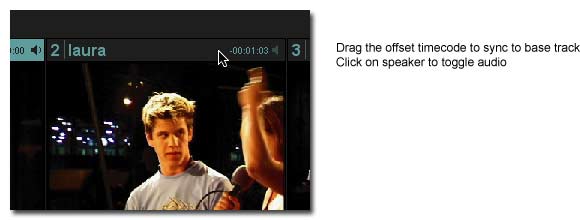
- Synchronize the remaining tracks to the base track by clicking and dragging on their offset timecode display.
- Dragging to the left advances a track by respect to the base track, and vice versa.
- Synchronizing can be done while the tracks are running.
- You can turn each track's audio on/off individually to help synchronizing by clicking on the little speaker next to a tracks offset timecode display. All activated audio will be exported to Final Cut Pro
- Synchronizing can be simplified a lot if you record a clear and unique cue with all cameras at the start of shooting (a clap or countdown for example)...
Basic Editing
- Press play or hit [space] and watch out for the best pictures from your cameras
- To cut to another camera, you can either click on the corresponding image or simply type its number on the keyboard.
Further Editing
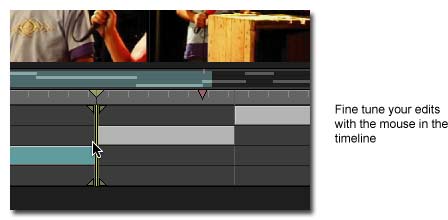
- You can ripple edits in the timeline with the mouse
- Shift-click on a camera window to change a selected edit to this camera
- Or use Shift-1 to Shift-4 to do the same
Exporting

- You can choose to either export your timeline as a Final Cut Pro XML file for later use: menu Project->Save as Final Cut Pro XML
- Or export directly into Final Cut Pro: menu Project->Export to Final Cut Pro
-
- Live Cut depends on XSL-Stylesheets to do the exportation in the correct format. Be sure to match your export settings to the format of your source files
- Live Cut comes with predefined export settings (DV-PAL, DV-NTSC). You can put additional stylesheets into the folder "/Library/Application Support/Live Cut/Export Templates/" (you'll have to restart Live Cut to see changes)
Keyboard Shortcuts
Navigation |
|
| Play/Pause |
Space |
| Rewind |
j |
| Stop |
k |
| Forward |
l |
| Step back two seconds |
Tab |
Markers |
|
| Set Marker |
m |
| Set and name Marker |
mm |
Editing |
|
| Cut to camera |
1 - 4 |
| Change camera |
Shift 1 - Shift 4 |
File |
|
| Undo |
z (not cmd-z) |
| Redo |
Shift-z |
| Open file |
Cmd-o |
| Save file |
Cmd-s |
[ << back ]